Tuesday, November 13th, 2012
This could be something extremely easy for the pro, but it took me hours to set this up. I'm using an old TP-Link wireless adapter. After installing the latest XBian (1.0 alpha 2) on my Raspberry Pi, I found no way to get myself to the terminal, even after pressing "Exit" from XBMC screen.
I had to plug in a network cable and ssh into it. For this version, the login details are:
user: xbian
password: raspberry
Whenever you run sudo, the password is "raspberry" too.
Once logged in, exit the blue setup screen. Then run the following command:
/sbin/ifconfig
You should see a new "wlan0" on top of the existing "eth0" and "lo" entries, if the wireless adapter was detected and installed correctly. I'm not sure what to do if it's not!
Run the following command to install the wireless tool.
sudo apt-get install wireless-tools
Then run the following command to set your WEP settings.
sudo /sbin/iwconfig wlan0 essid <ssid>

sudo /sbin/iwconfig wlan0 key <key>

sudo ifup wlan0
You should get your WEP wifi working by now. Alternatively, you can configure by editing your /etc/network/interfaces to something similar to the following:
auto lo
iface lo inet loopback
iface eth0 inet dhcp
allow-hotplug wlan0
iface wlan0 inet dhcp
wireless-essid <ssid>
wireless-key <password>
#wpa-roam /etc/wpa_supplicant/wpa_supplicant.conf
wireless-power off
iface default inet dhcp
Hope somebody would find this helpful. Do note that WEP is not secure enough for your wifi, always go for WPA2 whenever possible.
Saturday, July 18th, 2009
If you are following my twitter, you probably knew that two of my computers were struck by lightning few days ago. Had the hardware replaced. But that's not the solution to the problem although it gets the computer running again. I don't know when I'm going to get hit again.
So, I went to Digital Mall to get an Automatic Voltage Regulator (AVR). I find that most AVR came with surge protection. At most, the AVR will get spoiled and replacing an AVR only costs me RM50.00. Replacing power supplies, modems and motherboards costs much more!
The normal rating for AVR is at 800A. Looking at it, what is the ampere of a lightning? According to Wikipedia, an average one could go up to 30 kiloamperes (kA)!
What is 800A compared to 30kA?! So, the salesperson recommended me to use Belkin SurgeMaster Surge Protector which claims to protect up to 45kA (or higher, depending on model). It also came with insurance for your equipments connected to power through the Surge Protector.
There are a few models, I get the one that protects up to 45ka with maximum RM10,000 insurance. The price is at around RM150 only. Much cheaper than motherboards!
Consider getting one for yourself!
Monday, June 30th, 2008
My friend just purchased a new Dell Inspiron 1420 running on Windows Vista Home Premium, with a pink cover. Once we got the machine, we loaded it with some basic software and some photos. Thereafter, all she did was only normal surfing.
After a few hours, the machine began to slow down untill it hanged. After trying out every possible buttons and the system is still not responding, we have no choice but to press and hold the power button to shut it down.
The next time it started up, some of the Windows Vista system files got corrupted. So, the fastest recovery way would be to use Dell System Restore. I was surprised that the first few search results were not Dell Support pages (just like when we search for Windows problem, we normally don't get Microsoft support pages). Most of the pages asked me to press Ctrl + F11 when the system boots up to initiate Dell System Restore.
I failed to initiate the System Restore until I read it at yorkspace.com that I should press F8 if I'm using Windows Vista. The steps after that were very straight forward. A full guide taken from Dell Support page (which I found later) is as follows:
- Restart the computer.
- Tap <F8> during startup until the Windows Advanced Options menu appears. If the Windows Advanced Options menu does not appear, restart the computer, and try again.
- Press the <Down Arrow> until Repair Your Computer is highlighted, and press <Enter>.
- In the System Recovery Options window, log in as a user with administrative rights, and click OK.
- In the Windows Vista Recovery Environment, click to select your language, and click Next.
- Click System Restore.
- In the System Restore window, click Next to display the most recent restore points in chronological order.
- Click the Show restore points older than 5 days check box for a complete listing of restore points.
- Click to select a restore point.
A good starting point is to attempt to restore from the most recent restore point. If this fails to correct the problem, then try the next oldest restore point until the issue is resolved. Any software installed after the selected restore point needs to be reinstalled.
- Click Next and then Finish.
Though I successfully recovered the system, it did not go well the second time. The machine lasted for a few hours for me to reinstall everything, it slowed down and not responding again. I'll get Dell engineers to check up the system.
Monday, September 10th, 2007
I setup a new ADSL internet connection for my friend few months ago. Some easy settings in the wireless router got the internet working without any problem. However, after some time, he keeps complaining that his cordless phone in another room gets some noise when he turns on the wireless router.
I am very sure that I have installed splitter on the telephone line that modem is connecting. I think that would be sufficient and a phone from a different wall socket does not need a splitter. Although I know there is an answer for it but I was too lazy to find out, so I convinced him to live with it.
Until very recently, during my window shopping at Low Yat Plaza (local IT hardware hub) I saw a shop selling splitter Aztech DSL phone splitter (PS200) for only RM15 (USD 4). I think I could get one and try to install it on the second wall socket to see if it could fix the noise problem.
After trying it out, the noise is gone. If you encounter something like this, make sure you get a second splitter.
Saturday, May 12th, 2007
Living in my community, with a little knowledge about computers, I keep getting requests from friends or relatives to help on computer related matters. There is this relative who requested me to setup webcam and mic for Skype video conference. (A different case from the previous request to setup Skype)
Installing the webcam, with its driver, takes only a few minutes. Next, I proceed to install mic. Here are the steps to make sure that the mic is working:
- Go to Control Panel, Sounds and Audio Devices.
- Select Voice tab. Click 'Test hardware' button.
- Follow the steps on screen.
As I test the mic, I can't hear my voice at all, unless I blow very hard towards the mic. Fiddling with the volume control does not help at all. Then, I found out that the microphone boost was not turn on. To turn it on:
- In the Sound and Audio Devices control panel, go back to the first tab 'Volume'.
- Click the 'Advanced...' button in the 'Device volume' box.
- By default, Mic volume is not shown. Go to menu Options > Properties. Tick 'Mic volume' then click OK.
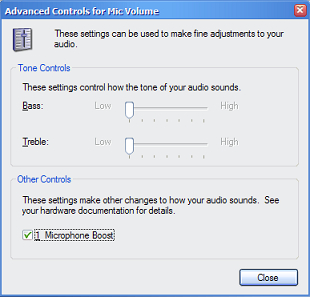
- Go to menu Options > Advanced Controls to show 'Advanced' button below 'Mic volume'.
- Tick 'Microphone Boost' then 'Close'.
In normal case, you should be able to hear your mic working by now.
However, I'm not that lucky. I hear a very high pitch sound coming from the computer speaker once I click on the 'Microphone Boost'. I had to instantly untick it to keep my ear working. Search in the web did not help. I'm certainly not expert in this but finally I don't get the high pitch sound after I reduce bass volume of the speaker.
Then, retested the mic. Installed Skype. Done!