Sunday, May 6th, 2007
I'm quite annoyed to see badly converted images on the web. They typically print screen and paste it on Microsoft Paint, then save as JPG. JPG files created that way look awful to me. I'm writing this to create a right-click shortcut to convert any image format to JPG nicely, with the help of ImageMagick command-line tools.
- Download ImageMagick, the Q16, DLL version from ImageMagick Download Page.
- Install the program.
- Start Registry Editor, start > run > regedit.
- Go to
HKEY_CLASSES_ROOT\*\shell
- Right click on shell > New > Key
- Type in:
Convert to JPG
- Right click on "Convert to JPG" > New > Key
- Type in:
command
- Select "command". Double click on "(Default)" on your right to change its value.
- Type in with the double quotes: "
C:\Program Files\ImageMagick-6.3.4-Q16\mogrify.exe" -format jpg -quality 100 "%1"
Take note of the ImageMagick installation path. You may need to modify that.
Your regedit would look something like this:
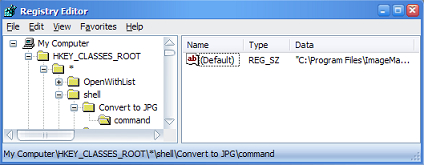
Your right click menu will have an additional item, Convert to JPG. Once you click on it, a new JPG file will be generated.
I'm certain that there are better ways to do it, but with ImageMagick installed you can do much more stuffs like this. (See: the power of ImageMagick)
Wednesday, April 25th, 2007
I remember I recommended Real Alternative codec last time. I found something more interesting this time. It's a single codec package that includes all audio and video codecs. The XP Codec Pack from Free-Codecs is the most complete codec pack that you will ever need.
The 2.0.7.1 version includes:
- AC3Filter 1.30b
- AVI Splitter 1.0.0.7
- CDXA Reader 1.0.0.1
- CoreAAC (AAC DirectShow Decoder) 1.2.0
- CoreFlac Decoder 0.4
- FFDShow MPEG-4 Video Decoder 2004.10.12
- GPL MPEG-1/2 Decoder 0.1.2.0
- Matroska Splitter 1.0.2.9
- Media Player Classic 6.4.9.0 rev. 609
- OggSplitter/CoreVorbis 1.1.0.79
- RealMedia Splitter 1.0.1.1
- RadLight MPC Filter 1.0.0.4
- RadLight APE Filter 1.0.0.4
- RadLight OFR Filter 1.0.0.4
- RadLight TTA Filter 1.0.0.2
- The Codec Detective 2.0
- VSFilter (DirectVobSub) 2.37
Enjoy!
Sunday, April 22nd, 2007
Not long ago, a friend asked me to assist on installing webcam on his new laptop and make it work with Skype.
In a few minutes, I had the hardware and driver installed properly, made the webcam working in software that came with the webcam, but failed to see the webcam listed in Skype options > Video > Select webcam. I thought getting the latest version would help. It didn't.
Finally, the solution was to install DirectX. Get DirectX from Microsoft DirectX website (or alternative DirectX download site). Install it and you will see the webcam listed in Skype.
I found quite a number of people having the same problem when I was searching for solution. Hope this post would work for the people out there.
Tuesday, November 7th, 2006
It is interesting to know that Mozilla provides a mechanism for us to lock any preferences in the option menu. If you would like to play with it, follow these instructions:
- Go to
Tools > Options...
- Change the setting of the preference you want to lock.
e.g. lock General > Home Page Location to "about:blank".
- Open "about:config" to find the key of the preference. Use the filter field to save your time from scrolling up and down.
e.g. Type in "homepage" and you can find "browser.startup.homepage".
- Open a notepad and write in the following lines:
//

lockPref("browser.startup.homepage", "about:blank");
- Save it as Mozilla.txt and do byte shift with an offset of 13. Use this byte shift service. You will receive a file "mozilla.cfg", which you must save it at the location of firefox.exe.
- Add the following line to "C:\Program Files\Mozilla Firefox\greprefs\all.js" file:
pref("general.config.filename", "mozilla.cfg");
You will find your homepage field in options uneditable after that.
Reference:
Locking Mozilla Firefox Settings
Monday, November 6th, 2006
I was requested to backup a partition of a PC, which will be very troublesome, if were to be reinstalled. The first thing that came to my mind was Norton Ghost. Since I was required to get a license for it, I search for open source alternative and I found Partition Saving. Here's how I did the backup, which I hope it would act as a general guide for you (and also for me to refer in the future).
PC Configuration:
- Operating System: Microsoft Windows XP Pro
- Filesystem: NTFS
- Number of Partitions: 2 (1 for OS, 1 for Backup)
- Hard disk size: Approx. 80GB in each partition
Preparation:
- Go to windows explorer and rename your hard disk partitions to clearly differentiate them. I renamed my C: to "OS" and D: to "BAK".
- Download partition saving. Choose language, then find download link at side bar.
- Create a boot disk using format function in Windows XP.
- Unzip the downloaded savepart.zip.
- Copy the savepart files into the boot disk, except the "doc" folder.
Create blank files (only for NTFS):
- Run savepart.exe from your desktop (it would be slower to run from floppy disk).
- Choose "Create some files on NTFS drive." and then "Ok".
- Create as many files you want at your backup partition (e.g. backup01, backup02 ... backup15). The maximum file size for each backup file is 2GB. So, I created 15 blank files to backup 25GB of data in my OS partition. With 15 blank files, I can backup up to 30GB of data.
Save partition:
- Boot your PC with the boot disk you created.
- When the system show you "A:>", launch "savepart".
- Choose "Save an element".
- Select the partition you want to save, see the last column. I choose the partition labeled "OS".
- Then, go for "Occupied sectors".
- When you were requested to choose save file location, you must mount the drive first if you are using NTFS at backup partition.
- After mounting, select the file in the drive, e.g. backup01 that you have created. Then "OK" to overwrite.
- Select the maximum size. I go for the default, 2GB.
- Compression ratio, go for 2, as recommended in the long user manual.
- You will be prompted to choose file 2, 3... n until the backup ends.
- In the end, the program will prompt you whether you want to save a config file to future ease save/restore. Choose "Yes" then select a file.
That's it. You have completed your backup. I wrote this with what I still have in my mind, without much verifications. If you found something is missing, please update me.
How about restoration? Not now!